This instruction manual informs you about the installation and the safe handling and use of the product. Pay special attention to the safety instructions and warnings in the manual and on the product.
The instruction manual is a part of the product. Keep this instruction manual for the complete working life of the product and ensure that it is easily accessible for all people involved with the product. If you receive any additions to or revisions of this instruction manual from Anton Paar GmbH, these must be treated as part of the instruction manual.
Download the current version of the EasyDens instruction manual from the Anton Paar website:
http://www.anton-paar.com/easydens
The following conventions for safety messages are used throughout this instruction manual:
Warning indicates a hazardous situation which, if not avoided, could result in death or serious injury.
Caution indicates a hazardous situation which, if not avoided, could result in minor or moderate injury.
Notice indicates a situation which, if not avoided, could result in damage to property.
Tip gives extra information about the situation at hand.
Read this instruction manual before using the instrument.
Make this instruction manual easily accessible to all persons working with the instrument.
Follow all tips and instructions in this instruction manual to ensure the correct use and safe functioning of the instrument.
This instruction manual does not claim to address all safety issues associated with the use of the instrument and samples. It is your responsibility to establish health and safety practices and to determine the applicability of regulatory limitations.
Anton Paar GmbH warrants the proper functioning of the instrument only if no modifications are made to mechanics, electronics, or instrument software.
Use the instrument only for the purpose described in the instruction manual. Anton Paar GmbH is not liable for damages caused by incorrect use of the instrument.
The results delivered by the instrument depend not only on the correct functioning of the instrument but also on various other factors.
Do not base any decisions concerning safety or commercial issues on data measured by EasyDens.
Do not use the instrument in medical areas.
Use EasyDens only as a stand-alone unit. Do not combine the instrument with other instruments or devices for automation purposes.
The instrument is intended for indoor use only.
Use only accessories and consumables supplied or approved by Anton Paar GmbH.
Ensure that all operators are familiar with the safety instructions for the instrument.
Ensure that children operate the instrument only under the supervision of adults.
Ensure that the instrument is sufficiently supervised during operation.
In case of damage or malfunction, do not continue operating the instrument. Do not operate the instrument under conditions which could result in damage to goods or injuries or loss of life.
Do not expose the instrument to temperatures below 0 °C (32 °F) when the measuring cell contains water. Freezing water will cause rupture of the measuring cell.
Do not apply any overpressure to the measuring cell. Fill the measuring cell by syringe only.
Liquids may spurt out of the instrument. Always use the instrument with a waste hose.
The instrument is not explosion-proof and therefore must not be operated in areas with risk of explosion.
Always keep a distance of at least 15 cm (6 in) between the instrument and an implanted cardiac pacemaker or defibrillator.
During operation of the instrument, the operator must be equipped with appropriate protective clothing (safety goggles, gloves).
Observe and adhere to your national safety regulations regarding the handling of all substances associated with your measurements (e.g. use safety goggles, gloves, respiratory protection, etc.).
For the handling of substances, abide by the corresponding material safety data sheets.
Fill only substances which will not pose a risk if they leak from the instrument in case of damage or malfunction.
Before a measurement, check the wetted parts of the instrument for chemical resistance to the samples and cleaning agents used. Fill only liquids which will not attack the wetted parts of the instrument.
Take care that the liquids (samples and cleaning agents) that you use are chemically compatible when they come into contact with each other. They must not react exothermally or produce harmful substances.
Before you start a measurement or cleaning procedure, take care that all parts, in particular the measuring cell, the injection adapters, the hoses, and the waste vessel, are properly connected and in good condition.
Before you start a measurement or cleaning procedure, check the injection adapters for leak tightness.
Take measures that spilled liquids cannot get into plug connections or venting slots of electrical appliances.
Be careful with hot samples. Handling samples with temperatures of more than 50 °C (122 °F) bears the risk of burns.
Observe the maximum sample temperature. At temperatures over 80 °C (176 °F), plastic parts soften and connections become leaky.
Keep potential sources of ignition, like sparks or open flames, at a safe distance from the instrument.
Store only the minimum required amount of sample, cleaning agents, and other flammable materials near the instrument.
Do not spill sample/cleaning agents or leave their containers uncovered. Immediately remove spilled sample/cleaning agents.
If the U-tube breaks, wipe off leaked liquids immediately to avoid risk of fire.
Ensure that the setup location is sufficiently ventilated. The environment of the instrument must be kept free of flammable gases and vapors.
Provide fire-extinguishing equipment.
Keep batteries away from children.
Do not leave batteries lying around unattended. They can be dangerous for children or pets if they use them as toys.
If a battery has been swallowed, seek medical advice immediately.
If the instrument is not to be used for a longer period, remove the batteries from the battery compartment.
Leaking or damaged batteries can cause burns if they come into contact with your skin. Use gloves for their handling.
Use the battery tape for removing batteries.
When you insert the batteries, ensure that the battery tape protrudes from under the batteries.
Never short-circuit or open batteries.
Do not expose batteries to heat or throw them into fire.
Do not charge non-rechargeable batteries. There is a risk of explosion.
Do not insert damaged batteries in the battery compartment. They can cause short circuits and fire.
Do not use lithium ion rechargable batteries or lithium ion batteries with the instrument.
Use only batteries type AA LR6 (alkaline) or rechargeable batteries type AA HR6 (NiMH).
For returns, contact the vendor of the instrument. The instrument must not be returned without the filled out "Safety Declaration for Instrument Repairs" and must be cleaned before return.
You must not return instruments which are contaminated by radioactive materials, infectious agents, or other harmful substances that cause health hazards.
Concerning the disposal of the instrument, observe the legal requirements in your country.
The portable density meter EasyDens measures the density of liquids by the oscillating U-tube method. In addition, a temperature sensor measures the sample temperature directly at the measuring cell.
You operate and control the instrument via the "EasyDens" app running on your smartphone. For the communication between EasyDens and your smartphone, Bluetooth is used.
EasyDens features various measuring units for display:
The density (ρ) of a sample is defined as its mass (m) divided by its volume (V):
| ρ = | m/V |
As the volume changes with temperature, density is a temperature-dependent quantity.
The sample is filled into a U-shaped borosilicate glass tube that is being electronically excited to vibrate at its characteristic frequency. The characteristic frequency changes depending on the density of the sample. With the determination of the characteristic frequency, the density of the sample can be calculated. Due to the temperature dependency of the density value, the temperature of the sample has to be determined precisely.
In binary mixtures, the density of the mixture is a function of its composition. Thus, with the aid of density/concentration tables, the density value of a binary mixture can be used to calculate its composition.
This procedure is also applicable for so-called quasi-binary mixtures. These mixtures contain two major components and some additional ones in very small concentrations compared to the two main components.
Many decarbonated soft drinks, for example, can be considered to be quasi-binary mixtures of sugar and water because the concentrations of flavors and acids are very small compared to those of sugar and water. Hence the sugar concentration can be determined with a density meter.
The same holds for the determination of the alcohol concentration in distillates that can be considered to be quasi-binary mixtures of ethanol and water.
EasyDens has been tested and packed carefully before shipment. However, damage may occur during transport.
Keep the packaging material for possible returns and for further questions from the transport or insurance company.
To check the delivery for completeness, compare the supplied parts to those listed in table "Supplied parts".
If a part is missing or damaged, contact the vendor of the instrument.
| Symbol | Pcs. | Article description | Mat. no. |
|---|---|---|---|
 |
1 | EasyDens portable density meter | 162929 |
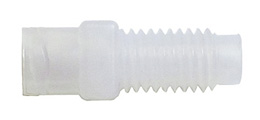 |
2 | Adapter Luer 1/4" UNF | 64792 |
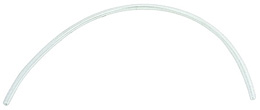 |
0.3 m | Hose 3x5 mm silicone | 50814 |
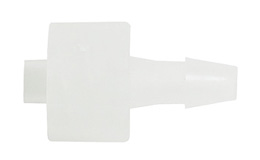 |
1 | Adapter Luer lock 1/8" | 131517 |
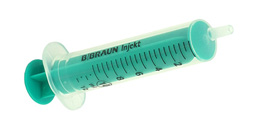 |
1 | Syringe 10 mL Luer | 1427 |
| Symbol | Pcs. | Article description | Mat. no. |
|---|---|---|---|
 |
1 | Protection cover for EasyDens (incl. 2# O-ring 6.02x2.62 Viton) |
165819 |
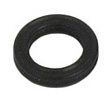 |
1 | O-ring 6.02x2.62 Viton | 168136 |
|
1 | Syringes 10 mL Luer (100 pcs.) | 6442 |
 |
|
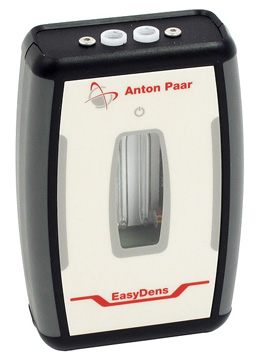
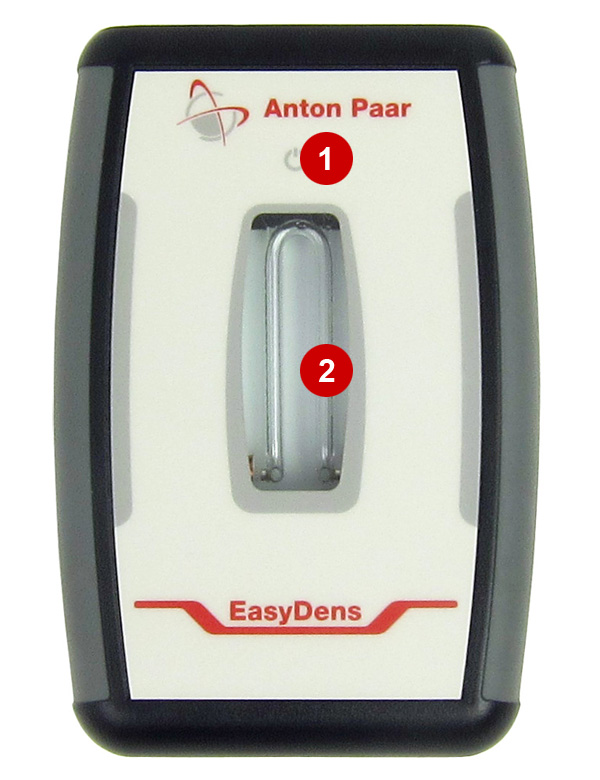
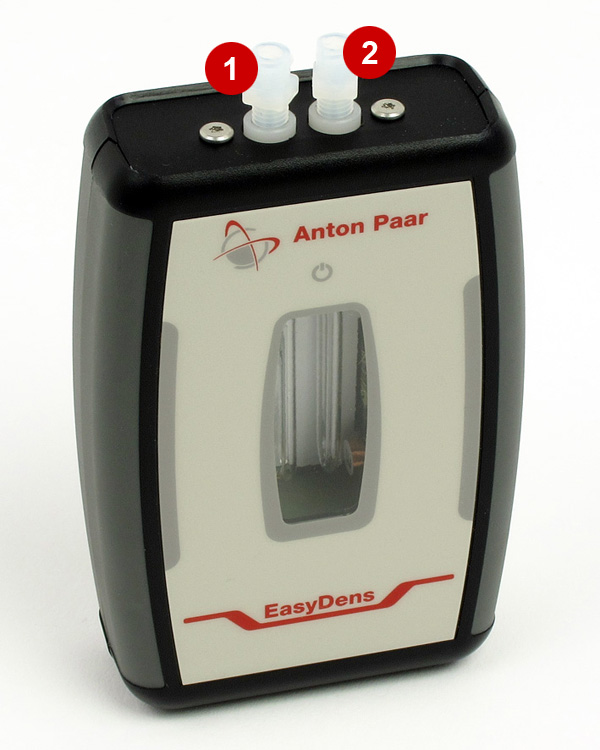
| 1 | power ON/OFF key |
| 2 | inspection window |
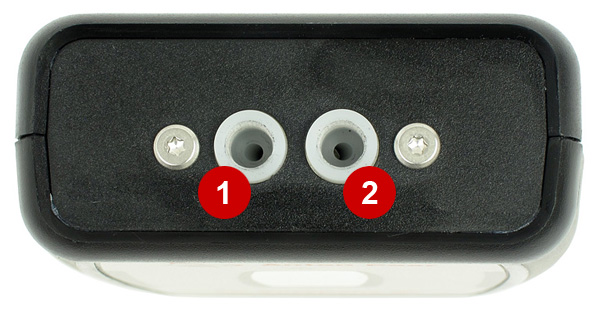
| 1, 2 | sample inlet/outlet |
| Screw in the injection adapters Luer 1/4" UNF here! |
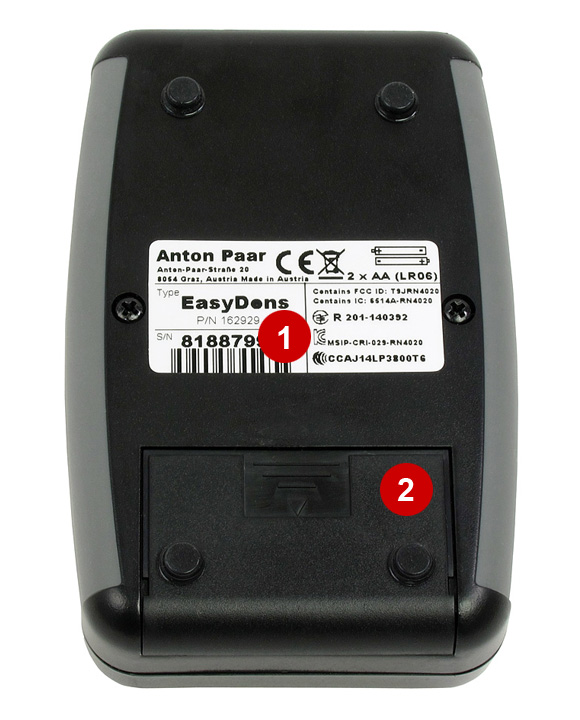
| 1 | type plate |
| 2 | cover of the battery compartment |
Protect the instrument against any collision or strong shock as this may lead to a malfunction of the instrument or break the measuring cell.
The instrument comes with a protection foil separating the batteries from the electrical contacts to prevent unintentionally powering on the instrument.
You need to remove this foil before you can use the instrument:
Slide open the cover of the battery compartment on the rear of the instrument, see fig. "Rear view of the instrument".
Remove the protection foil.
Close the cover of the battery compartment.
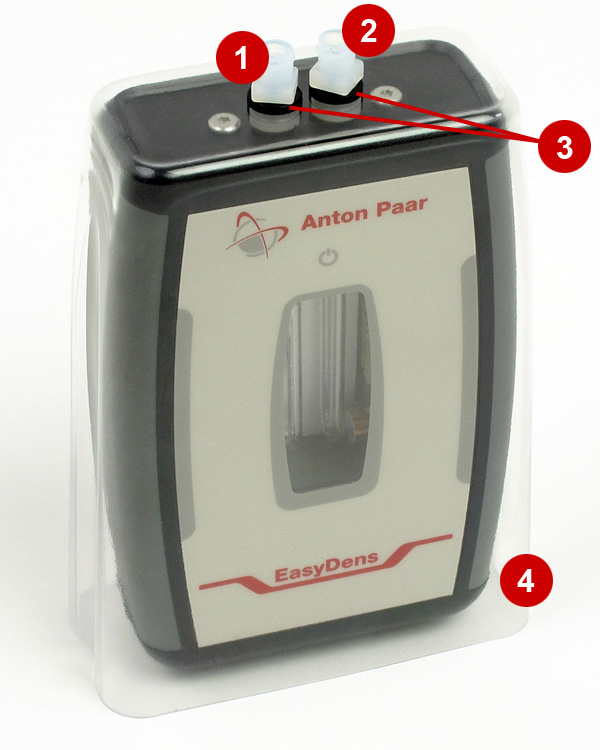
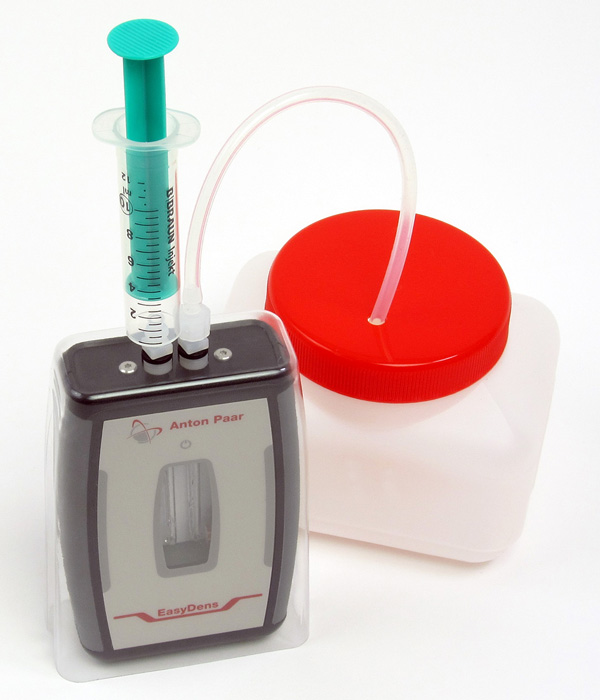
Screw the supplied injection adapters (Adapter Luer 1/4" UNF) into the sample inlet and outlet of the instrument, see fig. "Injection adapters mounted".
Screw the adapters in by hand until you feel some resistance against turning.
Do not use any tools!
| 1, 2 | injection adapters |
Put the protection cover over the instrument. Align the two holes in the protection cover with the sample inlet and outlet.
Put the supplied O-rings on the supplied injection adapters (Adapter Luer 1/4" UNF).
Stick the injection adapters with the O-rings through the holes in the protection cover and screw them into the sample inlet and outlet of the instrument, see fig. "Injection adapters mounted with optional protection cover".
Screw the adapters in by hand until you feel some resistance against turning.
Do not use any tools!
| 1, 2 | injection adapters |
| 3 | O-rings |
| 4 | protection cover |
Close one injection adapter tightly with your finger.
Use a plastic syringe to fill air with moderate pressure through the other adapter.
Wait for a few seconds.
Release the plunger of the syringe.
If the connections are tight, the plunger of the syringe will be slowly pushed back by the pressure in the measuring cell.
If the connections are leaky, the plunger will not move. In this case, remount the injection adapters (see section "Mounting the Injection Adapters").
Risk of eye injuries
Liquids may spurt out of the instrument. Always use the instrument with a waste hose.
Attach the supplied adapter Luer lock to one end of the supplied silicone hose.
Connect the adapter Luer lock on the hose to one of the injection adapters, see fig. "Waste hose connected".
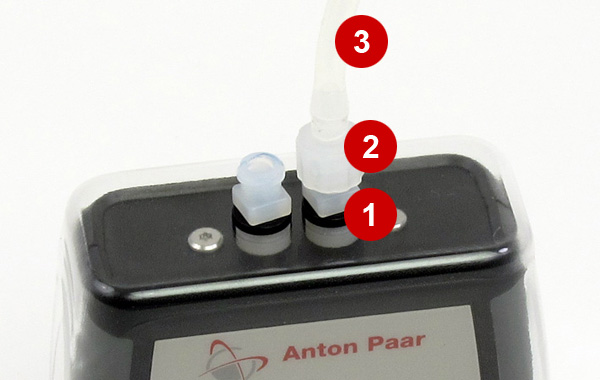
| 1 | injection adapter |
| 2 | adapter Luer lock |
| 3 | waste hose |
Lead the waste hose into a suitable waste container.
Ensure that the material of the waste container is resistant to the samples and cleaning agents which you are going to fill.

To switch the instrument on, press the ![]() key.
key.
A blinking blue LED will light up (visible in the inspection window) indicating that EasyDens is switched on.
To switch the instrument off, press the ![]() key again.
key again.
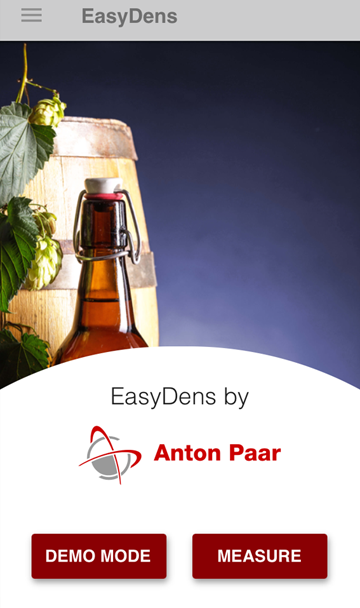
Get Anton Paar's EasyDens app for iOS free of charge at the App Store.
Start the EasyDens app on your smartphone:
Select "DEMO MODE" to check the app out without connecting to your EasyDens instrument.
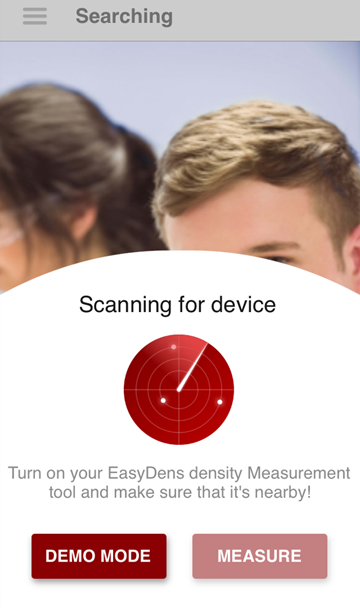
The app will automatically start scanning for EasyDens instruments nearby, see fig. "The EasyDens app scanning for instruments".
If it doesn't for some reason, select "MEASURE" to start the scan manually.
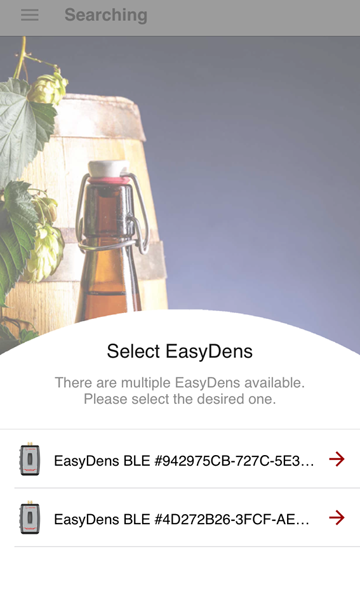
If only one instrument is found, the app will connect automatically with it.
If more than one instrument is found, you need to select from the shown list the one instrument with which you are going to measure, see fig. "The EasyDens app has found more than one instrument in its vicinity".
As soon as the app has established a connection with your EasyDens, the blue LED of the instrument will change from blinking to continuous light indicating a stable communication.
The measuring screen of the app comes up.
You are ready to start!
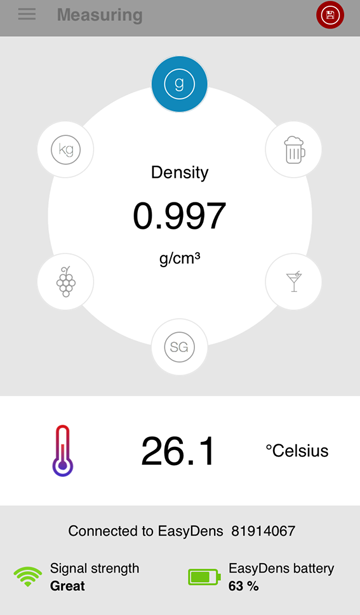
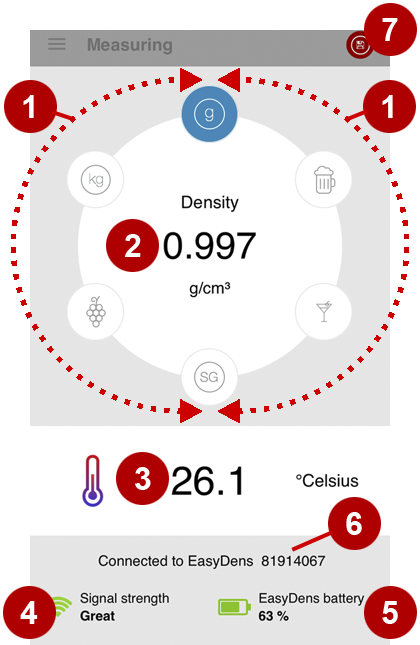
| 1 | Select a measuring unit here (Measuring units with a lock symbol on the icon are locked. To unlock them, see section "Selecting and Unlocking the Measuring Unit".) |
| 2 | Current measuring value |
| 3 | Current temperature of the measuring cell |
| 4 | Signal strength of the Bluetooth connection |
| 5 | Battery status of the connected EasyDens instrument |
| 6 | Serial number of the connected EasyDens instrument |
| 7 | <Save> button (to save a measuring value) |
To access the menu screen, tap ![]() on the measuring screen.
on the measuring screen.
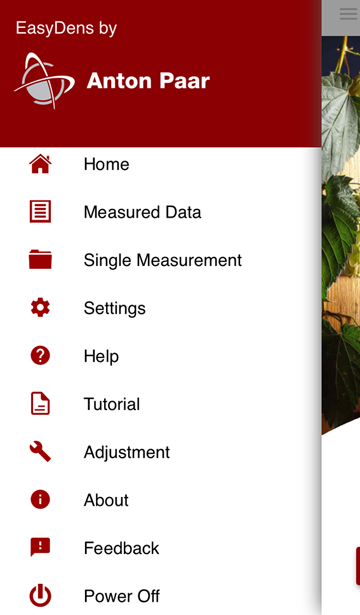
Return to the measuring screen.
Access a saved series of measurement data associated with a particular sample ID.
Access saved data of single measurements not associated with a sample ID.
Access the settings for
Access help information.
Learn how to set up and operate your EasyDens.
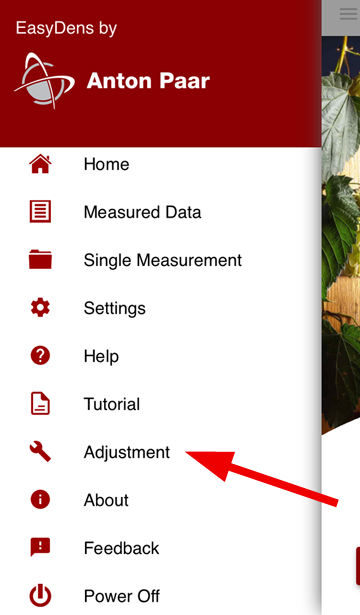
Select "Adjustment" to perform a water adjustment (see section "Water Adjustment").
Access information on the serial number and the firmware version of the connected EasyDens instrument, as well as the current app version.
Share your impressions and ideas about EasyDens with Anton Paar.
Switch off your EasyDens.
Handling samples with temperatures of more than 50 °C (122 °F) bears the risk of burns.
Wear appropriate protective clothing or take other protective measures when you handle hot samples.
Observe the maximum sample temperature. At temperatures over 80 °C (176 °F), plastic parts soften and connections become leaky.
Before you perform a measurement, make sure that the wetted parts are resistant to the sample and cleaning agents, see appendix "Wetted Parts".
Sample containing dissolved CO2 will cause bubbles in the measuring cell which will lead to invalid measurement results. Degas your sample carefully before measurement.
Either
boil the sample for several minutes,
or stir the sample for 5 to 15 minutes until no more bubbling occurs,
or put the sample in an ultrasonic bath for approx. 5 to 10 minutes.
Do not degas your sample by boiling or stirring it in an open container if it contains volatile components which you are going to measure, e.g. alcohol. With these methods, the volatile components will have (partially) evaporated after the procedure.
A suitable method for samples containing alcohol:
Fill the sample into a 1 L flask up to max. 1/3.
Seal the flask with a stopper.
Alternately shake the flask and release the pressure until no pressure is built up anymore.
Ensure that the measuring cell is filled free of gas bubbles. Reasons for gas bubbles in the measuring cell may be
gas bubbles in the sample,
leaky fitting of the injection adapters.
Fill the measuring cell completely.
Ensure that the sample temperature does not deviate too much (±5 °C/±9 °F) from the ambient temperature.
If the sample temperature is more than 5 °C/9 °F above ambient temperature, let the sample cool down before filling. You can speed up cooling with, e.g., a cold water bath.
If the sample temperature is more than 5 °C/9 °F below ambient temperature, wait before filling until the sample has reached ambient temperature. Do not use an auxiliary hot plate because alcohol might evaporate, and thereby the density of your sample may change.
Filling a very cold sample in a humid environment may cause water condensing on the U‑tube.
Carefully clean the instrument after each measurement series to avoid deposits in the measuring cell.
Have suitable solvents for cleaning at hand.
EasyDens features 6 measuring units:
| Density [g/cm3] | |
| Density [kg/m3] | |
| Specific Gravity SG | |
| Extract content [% w/w] | |
| Alcohol content [% v/v] | |
| Sugar content [°Brix] |
The measuring units Extract, Alcohol, and °Brix are initially locked (indicated by a lock symbol ![]() on the icon of the measuring unit).
on the icon of the measuring unit).
You may unlock one of these three measuring units free of charge:
Tap on the icon for the unit of your choice, and follow the instructions.
As soon as the unit is unlocked, the lock symbol will disappear.
You can unlock more measuring units by an "in-app purchase". You will be charged for these units.
To unlock more units, tap on the respective icon, and follow the instructions.
As soon as the unit is unlocked, the lock symbol will disappear.
On the measuring screen of the EasyDens app, tap on the respective icon to select a measuring unit.
Changing the measuring unit will also convert the displayed measuring value.
The sample temperature (measured by the integrated temperature sensor at the measuring cell) will always be displayed.
Ensure that the waste hose is properly connected and leads into a waste vessel, see section "Connecting the Waste Hose".
Fill a Luer tip syringe with the sample.
Stick the tip of the syringe in the open injection adapter (sample inlet).
Push the plunger of the syringe slowly and steadily until a drop emerges from the sample outlet adapter (where the waste hose is connected).
Leave the syringe in the filling position during the measurement to keep the liquid from running out.
Read the measuring results on the measuring screen of the EasyDens app on your smartphone.
EasyDens keeps measuring continually until switched off.
To save a measuring result, see section "Saving a Measuring Result".
Measure the next sample, or clean the measuring cell.
To save a measuring result, tap the <Save> button ![]() .
.
EasyDens will only save stable measuring values:
Measurement progress is shown by an arc encircling the measuring value, see fig. "Measurement progress shown by an arc".
If the measuring value is stable, the full circle finally turns green, then disappears.
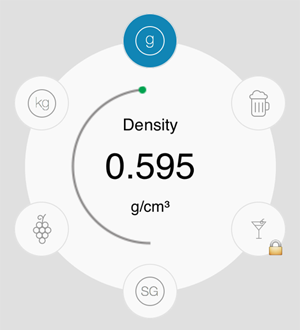
After a stable measuring value has been found, a popup window appears where you can choose how to save the measuring result, see fig. "Saving the measuring result".
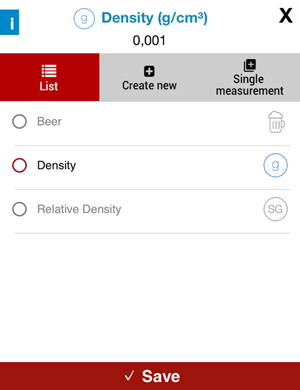
Select "List" to add the measuring result to the series of measurement data associated with an existing sample ID (see section "Managing Saved Data").
Select a sample ID from the list.
Select "Create new" to create a new sample ID (see section "Managing Saved Data") and associate the measuring result with it.
Select "Single measurement" to save the measuring result as a single measurement (see section "Managing Saved Data").
You can save a remark with the data.
Tap <Save>.
You can save a total of 100 measuring results. The EasyDens app will tell you when you have reached the limit.
Measuring results consist of
the measuring value,
the measuring unit, and
the measured temperature.
All saved measurement data include the date and time of the measurement.
You can save measuring results
as a single measurement or
as part of a series of measurement data associated with a sample ID.
Store measuring results as a single measurement if they are not associated with the results of other measurements: e.g. the result of a check measurement.
You can connect your measuring results to form a data series, typically to monitor the change of a sample property over time: e.g. daily measurement of the extract content during the fermentation of a beer. Simply assign the same sample ID to each measuring result of the series when you save it.
You can only assign a sample ID with matching measuring unit to a measuring result.
A sample ID identifies the sample to which a measuring result belongs: e.g. a beer sample starting with the new brew.
To be able to generate a fermentation curve, you need to connect the respective measuring results by associating them with a sample ID.
You can create up to 10 different sample IDs.
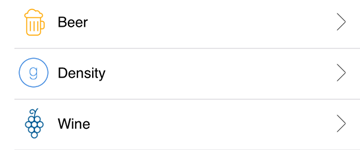
On the menu screen, select "Measured Data".
Tap "New".
In the popup window:
Enter a sample ID: Type in the sample's name.
Select a type of application:
Others
Beer
Wine
Milk
Select a measuring unit assigned to the sample ID.
Tap <Save>.
You can also create a new sample ID when you save a measuring result.
On the menu screen, select "Single Measurement".
You will see the following information (see fig. "Single measurement data"):
date and time of the measurement
measuring unit
measuring value
measured temperature
optional remark saved with the result
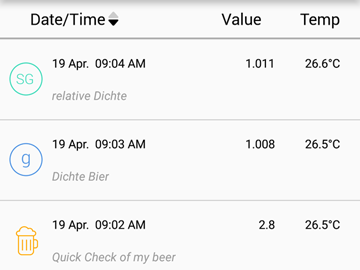
On the menu screen, select "Measured Data".
You will see a list of all sample IDs (see fig. "List of sample IDs"):
Select a sample ID to view the corresponding measurement log.
You will see the results of all measurements associated with the sample ID and a graph showing the change of the measuring values over time (see fig. "Measurement log of a sample ID"):
On the menu screen, select "Measured Data".
Select the sample ID of the measurement data which you want to export/share.
You will see the measurement log.
Tap <Share>.
Select a file format:
csv
Excel
Choose from a list of apps the one used for exporting/sharing.
Access the data that you want to delete.
In the drop-down menu, select "Delete".
Activate the checkboxes of the data that you want to delete.
Tap <Done>.
Confirm the operation.
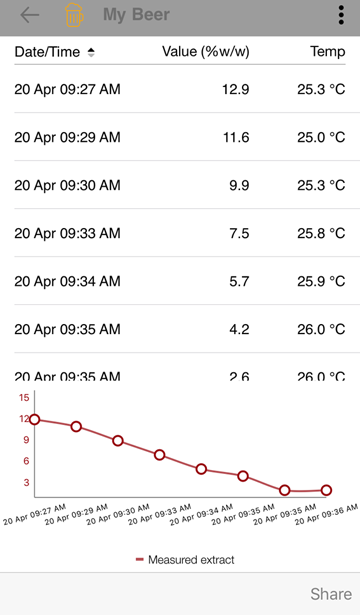
With EasyDens it is easy to chart the progress of fermentation:
Create a sample ID for your fermenting sample (see section "Creating a New Sample ID").
Perform measurements of the fermenting sample at regular intervals (e.g. daily).
Appropriately select
Extract content [% w/w] or
Specific Gravity SG or
Sugar content [°Brix]
as the measuring unit.
Save the measuring result and associate it with the sample ID for your fermenting product (see section "Saving a Measuring Result").
Simply access the data associated with the sample ID (see section "Accessing Data of a Data Series").
You will see a list of measuring results and a graph showing the decrease of your sample's extract content or sugar content over time.
The calculation of the alcohol content is a special feature for beer brewers only.
The alcohol content in beer is calculated according to the formula in the book by Hubert Hanghofer: Gutes Bier selbst brauen, BLV 2008 (ISBN 978-3-8354-0413-7).
In order to be able to calculate the alcohol content during or after fermentation, you need to:
select the application type "Beer" when you create the sample ID for your beer sample (see section "Creating a New Sample ID");
select Extract content [% w/w] or Specific Gravity SG as the measuring unit;
record a fermentation curve of your beer sample (see section "Recording a Fermentation Curve").
Access the data associated with the sample ID (see section "Accessing Data of a Data Series").
You will see the question "Want to calculate alcohol?" above the list of measuring results (see fig. "Turning on calculation of alcohol content").
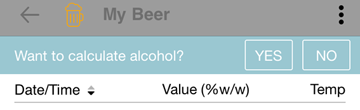
If you do not see the question:
Select "Turn on alcohol calculation" in the drop-down menu.
Tap <Yes> to calculate the alcohol content.
Select the measurement in the data series marking the start of fermentation (original extract):
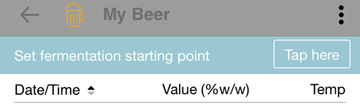
Tap <Tap here> (see fig. "Setting the start of fermentation").
Activate the checkbox at the measurement marking the start of fermentation.
Tap <Done>.
Confirm the setting.
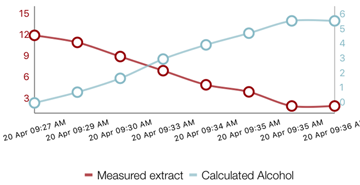
The alcohol content will be calculated for all measurements beginning with the set start of fermentation. The values are shown in the graph of the fermentation curve (see fig. "Fermentation curve with calculated alcohol content").
Read the calculated values from the scale of the graph. Zoom in to see details.
Always clean the measuring cell after work at the end of the day.
You may need to clean it more often …
when you are going to measure a sample that could chemically react with the previous sample,
when you are going to measure a sample that is not miscible with the previous sample.
A suitable cleaning liquid must dissolve and remove sample residues in the measuring cell. It has to be a good solvent for all sample components.
Use warm ultra-pure (bi-distilled or deionized) water as the cleaning liquid for beer or wine samples.
Do not use tap water instead of ultra-pure water because tap water will leave limescale in the measuring cell causing the measurement quality to deteriorate.
Fill air with a syringe into the measuring cell to empty the cell.
Rinse the measuring cell with a suitable cleaning liquid, e.g. ultra-pure (bi-distilled or deionized) water.
If you have not used ultra-pure water as the cleaning liquid in step 2, rinse the measuring cell with at least 10 mL ultra-pure water to remove the other cleaning liquid.
Empty the measuring cell as in step 1.
Once a week, clean the measuring cell with a suitable laboratory cleaner (e.g. Mucasol®).
Be sure to attend to the product information concerning the cleaning agent's concentration. E.g., Mucasol® is to be used as a 3 % solution, Alconox® and Tergazyme® as a 1 % solution.
Do not let the laboratory cleaner soak in for more than 5 minutes because the glass in the measuring cell is susceptible to attack by alkaline liquids.
Fill the measuring cell with the laboratory cleaner and leave the cleaner in the cell for approx. 5 minutes.
Rinse the measuring cell with at least 80 mL ultra-pure (bi-distilled or deionized) water.
Fill air with a syringe into the measuring cell to empty the cell.
Dispose of the samples and cleaning agents according to legal regulations.
Clean the housing and the inspection window with a soft cloth dipped in ethanol or warm water. If necessary, you can use a mild solvent (pH < 10).
Before you store away the instrument, clean it as described in section "Regular Cleaning of the Measuring Cell".
After cleaning the measuring cell with ultra-pure water, empty the measuring cell.
You need not worry about the measuring cell being still wet as long as you take care that the instrument is not exposed to freezing temperatures.
Do not expose the instrument to temperatures below 0 °C (32 °F) when the measuring cell contains water. Freezing water will cause rupture of the measuring cell.
Store the instrument in a dry place at room temperature. Storage in an environment with high air humidity can cause damage to your EasyDens.
If the measuring cell is not sufficiently cleaned, residues can form deposits in the measuring cell. Over time this will result in your measuring values deviating from the correct values.
You can detect the effect by comparing the density values that your instrument gives for deionized water with the correct values (at the respective temperature) that you can find in appendix "Density of Water". The two values must not differ by more than ±0.005 g/cm3.
Conveniently, there is a simpler method:
The measuring unit "Specific Gravity SG" already comes with temperature compensation, so you do not need to consider the measuring temperature. And with this measuring unit, the target value for deionized water is 1, so you need not bother looking values up in a table. Tolerances are ±0.005.
The same holds for the measuring unit "Extract [% w/w]" only that the target value for deionized water is 0 and tolerances are ±0.3 % w/w.
Perform a check measurement with deionized water regularly, see section "Check Measurement".
If you get a measuring value that deviates from the target value by more than given tolerances, you need to readjust the instrument by performing a water adjustment, see section "Water Adjustment".
Clean the measuring cell as described in section "Regular Cleaning of the Measuring Cell".
Rinse the measuring cell thoroughly with deionized water so that potential residues from other cleaning liquids are removed.
Preferably select the measuring unit "Specific Gravity SG" or "Extract [% w/w]" (if available), see section "Selecting and Unlocking the Measuring Unit".
Perform a measurement (see section "Filling Sample and Measuring") with deionized water.
Read the measuring value.
If the measuring value is in the valid range for the measuring unit (see table "Validity of the check measurement"), your EasyDens is ready for measurements.
If the measuring value is outside the valid range for the measuring unit (see table "Validity of the check measurement"), perform a water adjustment, see section "Water Adjustment".
| Measuring unit | Target value | Tolerances | Valid range |
|---|---|---|---|
| Specific Gravity SG | 1 | ±0.005 | [0.995 … 1.005] |
| Extract [% w/w] | 0 % w/w | ±0.3 % w/w | [−0.3 … +0.3] % w/w |
| Density | ρwater (T) (density of water at measured temperature T) see appendix "Density of Water" | ±0.005 g/cm3 | [ρwater (T)−0.005 … ρwater (T)+0.005] g/cm3 |
Fill the measuring cell with deionized water.
On the menu screen of the EasyDens app, select "Adjustment" to start the adjustment procedure.
Wait until the readjustment of your EasyDens is finished.
For proper battery handling, also observe section "Battery Handling" of the safety instructions.
You find the battery status of the instrument on the measuring screen of the EasyDens app (in the bottom right corner, see section "The Measuring Screen").
When the batteries are depleted, the instrument switches itself off.
Slide open the cover of the battery compartment on the rear of the instrument, see fig. "Rear view of the instrument".
Remove the depleted batteries with the aid of the battery tape.
Insert the new batteries.
Ensure that the battery tape protrudes from under the batteries.
Consider the polarity of the batteries when you insert them in the battery compartment.
Insert only equally charged batteries of the same type.
Close the cover of the battery compartment.
| Measuring range | |
|---|---|
| Density | 0.7 g/cm3 to 1.2 g/cm3 |
| Extract content | −10 % w/w to 40 % w/w |
| Alcohol content | 0 % v/v to 100 % v/v |
| Sugar content | −10 °Brix to 80 °Brix |
| Temperature | 5 °C to 30 °C (41 °F to 86 °F) |
| Accuracy | |
| Density * | 0.005 g/cm3 |
| Extract content | 0.3 % w/w |
| Alcohol content | 0.5 % v/v |
| Sugar content | 0.3 °Brix |
| Temperature | 0.2 °C (0.36 °F) |
| Repeatability s.d. | |
| Density | 0.002 g/cm3 |
| Temperature | 0.1 °C (0.18 °F) |
| Resolution | |
| Density | 0.001 g/cm3 |
| Extract content | 0.1 % w/w |
| Alcohol content | 0.1 % v/v |
| Sugar content | 0.1 °Brix |
| Temperature | 0.1 °C (0.1 °F) |
| Sample volume | approx. 2 mL |
| Sample temperature | 0 °C to 80 °C (32 °F to 176 °F) |
(*) The accuracy of the density measurement is specified as 0.001 g/cm3 for aqueous solutions (such as beer, wine, distilled spirits).
| Dimensions (L × W × H) | 120 mm × 80 mm × 35 mm (4.7 in × 3.1 in × 1.4 in) |
|---|---|
| Weight (incl. batteries) | approx. 200 g (0.44 lbs) |
| Power supply | |
| Battery type |
|
| Battery operation time | > 40 hours |
| Environmental conditions (EN 61010) | indoor use only |
| Operating conditions | Temperature: 5 °C to 35 °C (41 °F to 95 °F) Air humidity: 5 % to 90 % relative, non‑condensing |
| Storage conditions | Temperature: 5 °C to 35 °C (41 °F to 95 °F) Air humidity: 5 % to 90 % relative, non‑condensing |
| Interface | Bluetooth Low Energy
|
| Mobile Operating System | iOS 7.0 or higher |
| Material | Part |
|---|---|
| ABS (UL94 V‑0) (acrylonitrile butadiene styrene) |
housing |
| borosilicate glass | measuring cell |
| Kynar PVDF (polyvinylidene difluoride) |
connection block, adapter Luer lock 1/8" |
| PETG (polyethylene terephthalate glycol-modified) |
protection cover |
| silicone | hose 3x5 mm silicone |
| Tefzel ETFE (ethylene tetrafluoroethylene) |
adapters Luer 1/4" UNF |
| Viton | O-rings 6.02x2.62 |
| Alcohol content [% v/v] | To determine the alcohol content of binary water/ethanol solutions and spirits with a low extract content (e.g. clear schnapps, gin, vodka, …); temperature compensated to 20 °C; see also section "Measuring Principle" |
| Density [g/cm3] Density [kg/m3] |
Density of the sample at the current measuring temperature |
| Extract content [% w/w] | To determine the extract content of wort and the apparent extract of beer; temperature compensated to 20 °C |
| Specific Gravity SG | For the calculation of the specific gravity, the density of the sample, temperature compensated to 20 °C, is divided by the density of water at 20 °C. A temperature coefficient of 0.0003 g/cm3/K is applied for the temperature compensation of the sample's measured density. This coefficient is typical for aqueous solutions. |
| Sugar content [°Brix] | To determine the sugar content of binary water/sugar solutions as well as "quasi-binary solutions" (e.g. non-alcoholic beverages); temperature compensated to 20 °C; see also section "Measuring Principle" |
| Temp. °C | .0 | .1 | .2 | .3 | .4 | .5 | .6 | .7 | .8 | .9 |
|---|---|---|---|---|---|---|---|---|---|---|
| 0 | .99984 | .99985 | .99985 | .99986 | .99987 | .99987 | .99988 | .99988 | .99989 | .99989 |
| 1 | .99990 | .99990 | .99991 | .99991 | .99992 | .99992 | .99993 | .99993 | .99993 | .99994 |
| 2 | .99994 | .99994 | .99995 | .99995 | .99995 | .99995 | .99996 | .99996 | .99996 | .99996 |
| 3 | .99996 | .99997 | .99997 | .99997 | .99997 | .99997 | .99997 | .99997 | .99997 | .99997 |
| 4 | .99997 | .99997 | .99997 | .99997 | .99997 | .99997 | .99997 | .99997 | .99997 | .99997 |
| 5 | .99996 | .99996 | .99996 | .99996 | .99996 | .99995 | .99995 | .99995 | .99995 | .99994 |
| 6 | .99994 | .99994 | .99993 | .99993 | .99993 | .99992 | .99992 | .99991 | .99991 | .99991 |
| 7 | .99990 | .99990 | .99989 | .99989 | .99988 | .99988 | .99987 | .99987 | .99986 | .99985 |
| 8 | .99985 | .99984 | .99984 | .99983 | .99982 | .99982 | .99981 | .99980 | .99980 | .99979 |
| 9 | .99978 | .99977 | .99977 | .99976 | .99975 | .99974 | .99973 | .99973 | .99972 | .99971 |
| 10 | .99970 | .99969 | .99968 | .99967 | .99966 | .99965 | .99964 | .99963 | .99962 | .99961 |
| 11 | .99960 | .99959 | .99958 | .99957 | .99956 | .99955 | .99954 | .99953 | .99952 | .99951 |
| 12 | .99950 | .99949 | .99947 | .99946 | .99945 | .99944 | .99943 | .99941 | .99940 | .99939 |
| 13 | .99938 | .99936 | .99935 | .99934 | .99933 | .99931 | .99930 | .99929 | .99927 | .99926 |
| 14 | .99924 | .99923 | .99922 | .99920 | .99919 | .99917 | .99916 | .99914 | .99913 | .99911 |
| 15 | .99910 | .99908 | .99907 | .99905 | .99904 | .99902 | .99901 | .99899 | .99897 | .99896 |
| 16 | .99894 | .99893 | .99891 | .99889 | .99888 | .99886 | .99884 | .99883 | .99881 | .99879 |
| 17 | .99877 | .99876 | .99874 | .99872 | .99870 | .99869 | .99867 | .99865 | .99863 | .99861 |
| 18 | .99859 | .99858 | .99856 | .99854 | .99852 | .99850 | .99848 | .99846 | .99844 | .99842 |
| 19 | .99840 | .99838 | .99836 | .99835 | .99833 | .99831 | .99828 | .99826 | .99824 | .99822 |
| 20 | .99820 | .99818 | .99816 | .99814 | .99812 | .99810 | .99808 | .99806 | .99803 | .99801 |
| 21 | .99799 | .99797 | .99795 | .99793 | .99790 | .99788 | .99786 | .99784 | .99781 | .99779 |
| 22 | .99777 | .99775 | .99772 | .99770 | .99768 | .99765 | .99763 | .99761 | .99758 | .99756 |
| 23 | .99754 | .99751 | .99749 | .99747 | .99744 | .99742 | .99739 | .99737 | .99734 | .99732 |
| 24 | .99730 | .99727 | .99725 | .99722 | .99720 | .99717 | .99715 | .99712 | .99709 | .99707 |
| 25 | .99704 | .99702 | .99699 | .99697 | .99694 | .99691 | .99689 | .99686 | .99683 | .99681 |
| 26 | .99678 | .99676 | .99673 | .99670 | .99667 | .99665 | .99662 | .99659 | .99657 | .99654 |
| 27 | .99651 | .99648 | .99646 | .99643 | .99640 | .99637 | .99634 | .99632 | .99629 | .99626 |
| 28 | .99623 | .99620 | .99617 | .99615 | .99612 | .99609 | .99606 | .99603 | .99600 | .99597 |
| 29 | .99594 | .99591 | .99588 | .99585 | .99582 | .99579 | .99577 | .99574 | .99571 | .99568 |
| 30 | .99564 | .99561 | .99558 | .99555 | .99552 | .99549 | .99546 | .99543 | .99540 | .99537 |
| 31 | .99534 | .99531 | .99528 | .99524 | .99521 | .99518 | .99515 | .99512 | .99509 | .99506 |
| 32 | .99502 | .99499 | .99496 | .99493 | .99490 | .99486 | .99483 | .99480 | .99477 | .99473 |
| 33 | .99470 | .99467 | .99463 | .99460 | .99457 | .99454 | .99450 | .99447 | .99444 | .99440 |
| 34 | .99437 | .99433 | .99430 | .99427 | .99423 | .99420 | .99417 | .99413 | .99410 | .99406 |
| 35 | .99403 | .99399 | .99396 | .99393 | .99389 | .99386 | .99382 | .99379 | .99375 | .99372 |
| 36 | .99368 | .99365 | .99361 | .99358 | .99354 | .99350 | .99347 | .99343 | .99340 | .99336 |
| 37 | .99333 | .99329 | .99325 | .99322 | .99318 | .99314 | .99311 | .99307 | .99304 | .99300 |
| 38 | .99296 | .99292 | .99289 | .99285 | .99281 | .99278 | .99274 | .99270 | .99267 | .99263 |
| 39 | .99259 | .99255 | .99252 | .99248 | .99244 | .99240 | .99236 | .99233 | .99229 | .99225 |
| 40 | .99221 | .99217 | .99214 | .99210 | .99206 | .99202 | .99198 | .99194 | .99190 | .99186 |
(*) Excerpt from F. Spieweck, H. Bettin: Review: Solid and liquid density determination. tm – Technisches Messen 59 (1992) 7–8, pp. 285–292.
Under Industry Canada regulations, this radio transmitter may only operate using an antenna of a type and maximum (or lesser) gain approved for the transmitter by Industry Canada. To reduce potential radio interference to other users, the antenna type and its gain should be so chosen that the equivalent isotropically radiated power (e.i.r.p.) is not more than that necessary for successful communication.
Conformément à la réglementation d’Industrie Canada, le présent émetteur radio peut fonctionner avec une antenne d’un type et d’un gain maximal (ou inférieur) approuvé pour l’émetteur par Industrie Canada. Dans le but de réduire les risques de brouillage radioélectrique à l’intention des autres utilisateurs, il faut choisir le type d’antenne et son gain de sorte que la puissance isotrope rayonnée équivalente (p.i.r.e.) ne dépasse pas l’intensité nécessaire à l’etablissement d’une communication satisfaisante.
注意 !
依據 低功率電波輻射性電機管理辦法
第十二條 經型式認證合格之低功率射頻電
機, 非經許可,
公司、商號或使用者均不得擅自變更頻率、
加大功率或變更原設計
之特性及功能。
第十四條 低功率射頻電機之使用不得影響飛
航安全及干擾合法通信;
經發現有干擾現象時, 應立即停用, 並改善
至無干擾時方得繼續使用。
前項合法通信, 指依電信規定作業之無線電
信。
低功率射頻電機須忍受合法通信或工業、科
學及醫療用電波輻射性
電機設備之干擾。
This equipment has been tested and found to comply with the limits for a Class B digital device, pursuant to part 15 of the FCC Rules. These limits are designed to provide reasonable protection against harmful interference in a residential installation. This equipment generates, uses, and can radiate radio frequency energy, and if not installed and used in accordance with the instructions, may cause harmful interference to radio communications. However, there is no guarantee that interference will not occur in a particular installation. If this equipment does cause harmful interference to radio or television reception, which can be determined by turning the equipment off and on, the user is encouraged to try to correct the interference by one or more of the following measures:
Reorient or relocate the receiving antenna.
Increase the separation between the equipment and receiver.
Consult the dealer or an experienced radio/TV technician for help.
In case of a warranty claim, contact the vendor of your instrument who will take care of the necessary steps. The instrument must be cleaned before return.
See also section "Instrument Returns" for the corresponding safety instructions.
This document may contain errors and omissions. If you discover any such errors, or if you would like to see more information in this document, please contact us at our address below. Anton Paar assumes no liability for any errors or omissions in this document.
This document and its contents may be changed or amended by Anton Paar at any time without prior notice.
All rights reserved (including translation). This document, or any part of it, may not be reproduced, changed, copied, or distributed by means of electronic systems in any form (print, photocopy, microfilm, or any other process) without prior written permission by Anton Paar GmbH.
Trademarks, registered trademarks, trade names, etc. may be used in this document without being marked as such. They are the property of their respective owner.
Published by Anton Paar GmbH, Austria
Copyright © 2017 Anton Paar GmbH, Graz, Austria
Address of the instrument producer:
Anton Paar GmbH
Anton-Paar-Str. 20
A‑8054 Graz / Austria – Europe
Tel: +43 (0) 316 257-0
Fax: +43 (0) 316 257-257
E-Mail: info@anton-paar.com
Web: www.anton-paar.com